Wednesday, September 30, 2015

Teaching Colours #2

Teaching colours doesn't have to be boring.  Make a project out of it and spend a few weeks really making the most out of the subject.

Here are some activity ideas :

* Get some coloured cloths or paper.  Place them in different parts of the room/gym and let the kids run around.  When you blow a whistle and shout a colour they all have to run to that colour.  The last one to get there is out.  Play again and keep playing until one child is left, the winner.

* Ask the children to collect coloured items from around the classroom.  Have each child go off on the hunt for an item that is a certain colour.  Collect them in the center of your morning circle.  When you are finished you can let the children put the items away by saying their name and then a colour.  They then have to pick up an item you have in the center of that colour and tidy it away.  

Make this game more difficult by telling the children that their item must be original.  Example :  If a child has already brought a blue piece of lego/colouring pencil/book etc then no-one else is allowed to bring a piece of lego/colouring pencil/book etc.


* Make a colour laboratory!  You may be able to find a set to buy but you can also make your own using glasses or jars.  You will need food colouring and some kind of pipette or plastic syringe.  If you just use the primary colours the kids can mix some more interesting colours ;)


You can also make a worksheet for the kids to fill out while they experiement.  Just like real researchers!  Let them make notes on what colours are made when mixing other colours them.  The kids don't even have to be able to read or write.  Make your own with shapes to colour or find a Mouse Paint Worksheet using google.com

* There are so many games you can play that involve colours.   You may already have some of them or you can adapt ones you have.  Memory can be played using colours.  Have you every played Uno or Mau Mau?   Both games not only use colours but also use numbers.  You can even make your own games if you have some time to invest in the project but if you have some money to spend then the games at Orchard Toys are amazing.

* When you are finished with an activity and let the children go off to play or get dressed to go outside don't let them all leave at once.  Instead say all the children wearing pink are allowed to leave and tidy up/get dressed/wash their hands before lunch etc.  Make it harder by adding a specific item of clothing.  All children wearing orange socks etc.  This is a great way to stop all the kids rushing off to the next activity and being all wild.

* If you have access to items like balls and hula hoops you can make up some puzzles for the kids that also involve them getting some exercise.  For example tell the kids only five children are allowed in each red hula hoop.  Give them instructions like place a yellow ball inside a green hula hoop.  You can also make an obstacle course using coloured items (or mark items using coloured paper or cloths) and call out instructions.  Crawl under the green bank, walk around the yellow chair, stand on a purple cushion etc.

* Depending on how much time you have you can pick a new colour each week and pair it up to another subject.  For example :  Yellow is light for Lanternfest, Green is for Christmas trees, Blue is for the sea, Red is for fire or volcanos, and so on....

* Don't forget to make the colour project special and have a rainbow party at the end.  Also make sure you have something the kids can take home and keep.  One year we tie-dyed t-shirts to wear to our Betty Blue Party and those shirts kept being worn to Kindergarten until they were too small!

Enough ideas from me for now.  Feel free to add some of your own in the comments section.


Monday, September 28, 2015

Books : Halloween #2

Halloween books may actually be my favourites.  It isn't the 1st of October yet but I am itching to get my trusty friends back out of the cupboard and start reading them to this years group of kids.

My first post about Halloween books was all about Winnie the Witch.  This time around there some more witches but also some creepy crawlies and something for the younger children.

The Witch's Children are three youngsters who haven't quite got the hang of their magic skills.  What starts off as a good deed ends up in chaos and the children have to ask for help to get everything fixed.

The book pictured is the first release and there are two more installments,The Witch's Children Go To School and The Witch's Children And The Queen.

Well written with wonderful illustrations, these books remind children who the most important person is and that they can always go to her for help.  Even if she is a witch! ;)

Next up, Aaaaarrgghh! Spider!

This is a favourite of mine even though I hate spiders.  The story is so funny and the kids always love it and ask it to be read again and again.

If you read this one right, with some drama and loudness, you will get some great reactions from the children.

But beware!  Every time I read this one there is a sudden rise in the spider population in work but all the children start screaming Aaaaarrgghh! Spider! Out! You! Go! and it makes it all worth while ;)

Make sure you check out some other books by this author.  She has some really nice ones out there and each book so far has always been a hit.  I am still collecting but I can highly recommend What the Ladybird Heard as well as The Princess and the Wizard.

Spot is a classic and I remember reading his books when I was young.  They are simple and are over quickly but younger children will really appreciate the pace.

Spot's Halloween has the basics and won't scare your kids.  It is also good for the older Kindergarten age to go over what they already should know in terms of Halloween vocab.

A definite must have for teaching Halloween, counting and much more.  Spot comes in all shapes and sizes and there are also books focusing on Easter and Christmas.  Good books to have in your collection for every festivity.

Do you have any book recommendations?  Feel free to comment below and let me know!


Sunday, September 27, 2015

Autumn Arts & Crafts #1


You only need to look out of the window to see that Autumn is here.  There are conkers all around and the leaves are falling even though the trees are still green.

Usually Autumn is busy and filled with Halloween and Lantern Fest (more about that later) and I don't usually end up making anything for the Fall.  However now and again I have had time and here are a couple of arts and crafts you can make this Fall.  I will post more sometime this week.

First up is my Autumn Tree.  I saw this somewhere on the Internet and this is the second year I have used the technique.  It is very simple and easy but the children have to concentrate and use their fine motor skills to complete the picture.  A great way to observe the kids and see if any of them are having problems.

All you need for this art project is a sheet a paper, paints and cotton buds/Q tips .  Draw the outline of a tree (you can copy it if you don't want to draw each single one) then prepare some Autumn coloured paint (you don't need much so just a blob of each will be enough).  Then you take a cotton bud/Q tip and dip (don't smear!) one end into the paint.  Then the cotton bud/Q tip can be used to make the dots you see on the picture.

Make sure the children learn that they don't have to dip after each dot.  They can make sometimes up to ten dots with one dip of paint.  Try and get them to keep within the lines and check they are holding the cotton bud/Q tip properly.  Give them time and see how long they take.  It looks like a fast activity but I found most kids spend at least 10 to 15 mins on their tree.

You can let the kids write Autumn at the top and the word in their language if you are teaching English to non-native speakers.  Our trees go into our Portfolios (not sure what that is?  Here is an article about Portfolios) to not only show development but also for seasonal order of the folder.

This is an easy arts & crafts project which doesn't use a lot of materials.  You can use the cotton buds/Q tips for more than one child and use each cotton bud/Q tip for two colours (one each end).  Tidying up afterwards is also easy because you just throw the cotton buds/Q tips away!

This next project was actually made by my colleague but I wanted to share it because it looks so cute.

Hedgehog isn't an easy word for English learners but it is an animal that's associated with this time of year.  This arts & crafts activity needs some preparation time on your part but the kids will enjoy it.

Make yourself a template for the body, head and nose.  Draw around the template on thick coloured paper if you want to hang them up as decoration like we did or thinner paper if it doesn't matter.  Then you roughly cut around the shapes you have traced (don't cut them out perfectly!).

Then you can give the pieces to the children to cut out.  They may find the nose difficult as it is small but the head shouldn't be a problem.  The usual challenge with this one is cutting out the hedgehogs body with all those spikes.  However if you are making this with older children it is a great way to see how good they are at cutting and if they need help with their development.   Make sure you are ready to give them tips on how to improve their technique.

When all the pieces are cut out you just have to stick them together.  My colleague used wiggly eyes and stuck tooth picks on the hedgehogs body to make it look more prickly.  She also used white cardboard for the body and let the children paint the body using sponges and brown paint.  The result was a nice effect that you can't really see in the photo above.

Have any ideas you would like to share?  Feel free to comment in the comments section!


Saturday, September 26, 2015

Fun Songs #1 : Grumpysaurus

A few years ago my boss encouraged me to learn how to play the guitar.  It was always something I had wanted to do since I was a teenager but courses were expensive and I didn't really have the time or money back then.

Older and wiser I decided I should at least look into it.  So I went home and looked up a few of the basics and chords.  It didn't look easy but I started simple and my partner gave me some tips.  I started practicing while in work with the kids (more about that later) and one day Grumpysaurus was born.

I was practicing three chords and changing between them when a kid had a bit of a tantrum.  A couple of days earlier I had seen the Grumposaur (see pic) somewhere and I told the kid  he was being a Grumpysaurus.  He instantly stopped having his tantrum and asked me what's a Grumpysaurus?  I improvised and started singing the simple text to the chords I was playing.

All the kids started singing along and I was surprised when they started suggesting more verses. Years later a special little boy called Ben even came up with a new verse.  I haven't added it to the text file yet but he is called Sillysaurus and I am sure there are more verses to come!

Each verse has its own sound or action.  Hungrysaurus goes Nom Nom Nom,  Iloveyousaurus makes a heart with his hands and the newest addition, Sillysaurus, makes faces.  It isn't hard to come up with actions, just ask the kids!  They came up with all the ones I use! :)

It is a simple song and a lot of fun.   The kids get to learn some words to do with actions and feelings plus the get some exercise if they move around while singing.

I hope there are other children out there who will enjoy singing it as much as the many children I have sung it with over the years.  It continues to be a favourite and is sung at least once a week in my group.

Listen to the first verse of the song below.  Also open the link for the song text and guitar chords.


If you come up with some new verses then please share them in the comments!!  


Friday, September 25, 2015

Teaching Colours #1


Colours is one of the first subjects I teach a new bunch of kids.  It doesn't matter how young or old they are, it is always good to go back over the basics.   Making the subject interesting for the children will get them even more interested and there is more to teaching colours than just singing about a rainbow!

Kids pick up the names of the main colours pretty quickly but why not show them a little bit more?  Teach them some science!  Have some fun! Over the years I have done various colour projects and/or Morning Circles.  This post shows various activities and ideas you can use to be colourful and creative!

Meet Oliver Orange and his friends (you can use any names you want). They came along to Kindergarten and got to know the kids. Oliver asked the children where they have seen the colour orange before.  The other colourful friends also ask about their colours.  This can be a long conversation with the group if you have chatty kids so make sure you plan enough time.

This activity encouraged the children to think about items they see in everyday life.  It is interesting to see what they come up with!  I also used my flash cards in various ways.  For example the children had to match them to the correct Colourful Friend (make them repeat the colours, words, names out loud) and got a little exercise at the same time.  The activity will last longer if your kids get a bit of movement now and again.  Even if it is just getting up and placing a flashcard on the floor.

You can get all the Colourful Friends involved in the morning circle and depending on your activity for the Morning Circle they can even lend you a hand ;)  Let one of the colours tell a story/read a book.  Hide your coloured friends around the group and get the kids to look for them.  Also get the children to find items in the room with the same colour.  This is a great way to observe what the kids have really understood.

My Colourful Friends also had a rainbow house to live in.  Let the kids get involved by helping you make the house.  It's a simple craft project but the kids loved it.   We made the house out of a cardboard box and lots and lots of coloured paper squares but let your imagine run wild and come up with your own special house.   All the colours sleep in the house which made it easy to take the house with me to the other group that I was teaching.

One of the things you really need to show the kids when you are working with colours is how they mix to make other colours.  I usually make a colour wheel with them.  Just draw the circle (as big or small as you like) and divide it into six pieces.  Have the kids colour in a blue area, a red area and a yellow area.  Make sure they leave a space between each colour.

Then let them mix the colours together.  Red and Yellow is orange.  Talk to them about it.  Get them to repeat everything.  This is especially important for kids who are going to school soon.

There are some great books you can use to help teach colours and my go to book is Mouse Paint.  Three mice manage to get their paws on some paints.  What happens next is just fun and educational.  You can even look on the internet for some great activites to use with the book.

Mouse Paint is a great book and I have used it in many activities.  So expect to hear about it again!

Teaching English to non-native speaking children isn't just singing songs.  You can do arts & crafts and also experiments.  A great experiment to try while teaching about colours is this one below.  After mixing colours to make other colours it will interest the children to find out that many of the colours we use (eg. Felt tip pens) are actually two or more colours mixed to make one.  All you need are normal colouring pens and some white coffee filters.

First you need to pick your colours.  Three are usually enough.  Make three coloured dots on the bottom end of the coffee filter and then add water.  Either dip the filter into water or use something to drop water onto the bottom.

Within seconds the coloured dots will spread and the majority will split into different colours.  This is a trial and error process at times because some pens are better than others with some colours working better than others.

You can get some amazing results and can even fill the coffee filters completely and use them for some other arts & crafts.  The filters make great butterflies if you split them in half.

One of the important things to do when you have a project going on is to show off your work! Make a poster to hang up in the group or outside where the parents can see it or make something for the kids to take home.

There are more colour ideas to come!  Feel free to add your ideas to the comments!


Thursday, September 24, 2015

Food Songs #1 : Lunchtime


I don't even remember having to say Grace as a child so it was a weird thing to see and hear when I started working in Kindergarten.  It wasn't a religious thing but it was a ritual and table manners.  I learnt to enjoy the little chants or songs and tried to find suitable English versions.

It wasn't easy finding anything that wasn't slightly religious or too difficult.  With a little thought I came up with this simple rhyme that the kids enjoyed for years : Yum Yum

Of course I got bored with the same old and with some inspiration (from somewhere on the internet) I came up with this little ditty sung to the well know tune 'If you are Happy and you know it' :  Hungry as a Bear

There are some great German lunch songs/ Graces which are called Tischsprüche.  Most of these rhymes don't translate very well into English but one we used did and while it isn't the easiest one to remember it is fun and teaches the directions on a compass ; The Way to Eat

A work colleague of mine recently introduced me to two more Lunch songs.  The first one is a simple 'repeat after me' to the tune of Frere Jacques : Are you Hungry?   The second is more of a poem.  I have heard it before but never had the text to pass on : One Little Mouth

I am working on finding/writing some new songs for lunchtime.  If you have any you want to share then feel free to post them in the comments section of this post.


Wednesday, September 23, 2015

Books : Halloween #1


Books are a great way to teach English to children but you have to find the ones that the kids really enjoy.  Over the years I have bought and read so many books but there are always ones that stand out.  These are the books that the children ask for again and again.  The ones that they convince their parents to buy in their Mother tongue or sometimes even in English.

Every Halloween has me grabbing the Winnie the Witch series by Valerie Thomas.  Actually I want to start reading them now even though it isn't October yet!  I think I have all of the books in the series and already ordered the latest release!

Winnie the Witch and her cat Wilbur are fun, interesting and unforgettable.  The illustrations by Korky Paul really bring the story to life and the little details in these picture books will have the kids looking at them for hours.

I always let the kids say the spells with me and even add special movements if Winnie only says Abracadabra.  The children love waving their pretend magic wands around five times or even ten times before shouting the magic word.  Counting, colours and much more are involved in these stories and you can teach many a topic using these books.

My children also love to see the pictures that are on the inside covers.  They are drawings from children all over the world and I always have to tell them the names, ages and country of the artists who have been picked for each book (found at the beginning of the book).

There is also a Winnie the Witch song/chant.  I end the song with a nice 1, 2, 3, Abracadabra! (see below) and try and use as many hand movements as possible.  Also try clicking your fingers or clapping with the chorus.

I highly suggest trying these books with all ages.  Even the adults like them ;)

I am not sure how many other languages the books have been translated into but the German versions are fun because Winnie is called Zilly and her cat Wilbur is called Zimbargo.  This amuses the kids and it is also nice if you can the version in your local language to not only compare but to make sure the children understand the whole story.

If you are buying the books new then look for the collections.  There are various options available with 6 books in 1 or 3 in 1.  On Amazon I also saw a nice package of 5 books with some activity books included that release in October.


Do you have any Halloween book suggestions?  Feel free to comment and share!


Tuesday, September 22, 2015

Halloween Songs #1 : Ghosts Wanna Be Loved


Halloween is a fun time and even though it isn't celebrated here in Austria as much as in the UK and USA the kids love singing along and having a party.

Over the years I have sung a lot of different Halloween songs but since I learnt to play the guitar I have been writing my own songs.

This Halloween song is one of my favourites and the kids love it.  I came across the beginning/idea on an internet search (can't remember where!) and it reminded me of that Cyndi Lauper song, Girls Just Wanna Have Fun.

Ghosts Wanna Be Loved was born!  Click on the link to get the text and you can listen to a recording below.


Halloween Arts & Crafts #2

It may seem a little early to be thinking about  Halloween already but it is always good to be prepared!  Also it is nice to decorate a little during the weeks before the spooky day arrives!

Ghost Lollipops

Very simple and a nice treat!  Just get some lollipops (round ones would better!) and then you need an old white sheet or tissue paper.  Wrap the white fabric/paper around the lollipop so that it hangs down like a ghost.  Use wool or string to tie the ghost together.

You can get the kids to cut the materials and also practice making knots.  Let them draw a face on their ghosts to make them even more spooky.


Pumpkin Window Deco

This is a nice activity for younger children and also a nice decoration if you have windows that need some Halloween/Autumn colour.

I drew the border on brown paper and let the kids cut out the shape themselves.  Baking paper was stuck on the back and then orange pieces of crepe paper or tissue paper were stuck on.

The children then added a face and a nice green stem.

Pumpkin Jack'o'Lanterns

We have something called Laterne Fest here (more about that later) and one year I combined it with Halloween because they are so close together and due to the fact that this one takes a long time to make with a group of kids.

It is your typical paper mache from newspaper and wallpaper paste.  I collected free newspapers and you can buy wallpaper paste at any DIY store.  You also need a balloon to get the shape.

When you have everything make sure you have a nice thick paste and that the newspaper is torn into strips.  Then it starts getting messy and fun!  Make sure you have some kind of protective clothing for the kids!

Paste the balloon and add the paper.  Keep doing this until the balloon is completely covered and has a few layers on it.  The let it dry.  This can be tricky...I usually tie some wool to the end of the balloon and leave them hanging around somewhere.  If you can do this on a Friday you will have nice dry ready to paint paper mache balls on Monday.

Pop the balloon, paint the pumpkin and then out the face when the paint is dry.  Put in a candle (a fake battery one is better and safer) and you have a nice Jack'o'Lantern.  If you want to use this for Laterne Fest then you can add a wire or wool holder to the top so the kids can carry it around.


What spooky stuff do you make for Halloween? Feel free to comment!


Monday, September 21, 2015

National Bank Holiday - Austria


There isn't much you can do for a National Bank Holiday (Austria 26.10).  Especially if you are teaching English in a foreign land.  But there are always cookies!

I made these using just normal biscuits and icing.  Mixing icing sugar and water (add a few drops of water till you get a nice consistency) and any coloured icing you need is just a matter of adding food colouring.

I packaged them up in little plastic bags and added a nice note wishing a Happy Bank Holiday.  The kids loved making them and loved eating them too!


Of course this could get a little messy and difficult for some flags.  What ideas do you have for celebrating your local National holidays?   Feel free to comment!


Sunday, September 20, 2015

Halloween Arts & Crafts #1


There are so more different arts & crafts projects out there to make for Halloween. Here are some of my previous efforts with the kids!

Monster Bags

The must have for any trick or treater.  I ordered white paper bags but I am sure you can use any paper bag that you get from the store.  After painting the bags and letting them dry the kids cut out the eyes, nose, mouth and ears from coloured paper.

Each bag was different and each one more scarier than the next.

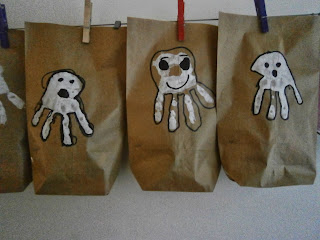
Ghost Bags

Spooky and easy to make.  These bags were much smaller and didn't have handles.  Much better for parties that aren't going to offer a huge amount of treats.

Just get the kids to make a white upside down hand print and let them add a face.  Make sure the paint dries before adding anything else to the design.

Some glitter added to the drying paint makes these bags really sparkle.

Pumpkin Pompoms

This is an art project for older kids. A great way to help fine motor skills and train concentrate and patience.  Oh and they make great decorations.

If you have never made pompoms before then you will want to try it out yourself first.  Here is a video that shows you how.  Make sure you have enough wool and cardboard and thats all you really need.  I used two different shades of orange to make the pompoms less boring and also made a piece green so it really could be a pumpkin ;)

The faces are just paper stuck on.  Get the kids to draw the face first and then cut and stick.  I had some wiggly eyes going spare which made the pumpkins look even better.

Nespresso Spiders

I have a Nespresso coffee machine and hate throwing those used capsules away.  After seeing people make jewelery with them I decided I could also use them in Kindergarten.

Just empty and clean out the capsules and get the kids to jump on them.  This is really fun for them.  If you have a workbench then you can even let them hammer them flat.

I used two capsules per spider.  Front and back.  The pipe cleaners are glued in between the two capsules and the string to hang them up is also glued between the capsules.  Wiggly eyes look best on the spider and a piece of paper for the mouth.

You don't have to use dark coloured capsules but I found the black, brown and grey ones looked the best.

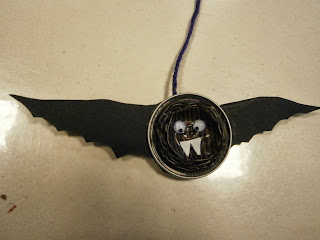
 Nespresso Bats

Not much different to the spiders.  Two capsules with the wings made out of black paper glued between them.  Also add some string between the capsules if you want to hang the bat up.

The wiggly eyes are easy to apply and the kids also added vampire like teeth cut out of white paper.

Easy to make and let the kids stamp the capsules themselves.  Just don't let them cut open and clean the capsules.  The sharp edges are not to be messed with.

Franken Monster Game

We had a big delivery and it is really hard for me to throw away such a nice big box.  I drew a monster on the one side and the kids helped me paint him.  We cut out the mouth and made a hole on his t-shirt and used this as a throwing game.

Actually we used pumpkin pompoms (see above) as balls and awarded five points for a pumpkin in the mouth and one point for every pumpkin the kids managed to get through the bigger hole.


Do you have any Halloween ideas you would like to share?  
Feel free to send them to me at MyKindergartenPlace@gmx.net


Saturday, September 19, 2015

My Kindergarten Place


My Kindergarten Place is a blog that will hopefully help other English Native Speakers working in Kindergartens all over the world.

While there are lots of various sites all over the Internet with a wide range of songs, activities and other resources I hope that My Kindergarten Place will be different.  I hope it will be the the kind of blog that I have always wanted to find.

Feel free to share your experiences, suggest ideas and help me build up a collection that anyone can use.  While I encourage all songs, pictures and ideas you find here to be used and shared please take note of any copyrights.